Ice dams represent one of the most destructive winter problems facing Minnesota homeowners. These thick ridges of ice form along roof edges, trapping melting snow that seeps under shingles and causes thousands in water damage. Understanding how ice dams form, recognizing early warning signs, and knowing proven prevention methods can save you from emergency repairs and insurance claims.
What Ice Dams Are and Why They Form
Ice dams occur when heat escaping from your home melts snow on your roof. The melted water flows down to the cold roof edge and refreezes, creating a dam that traps subsequent meltwater. This trapped water has nowhere to go except under your shingles, into your home.
The formation process follows these steps:
- Heat from living spaces rises into the attic, warming the roof deck
- Snow on the warm upper roof melts and flows downward as water
- Water reaches the cold eave overhang where it refreezes into ice
- The ice buildup creates a dam that blocks proper drainage
- Trapped water backs up under shingles and penetrates the roof structure
- Water enters your home through ceilings, walls, and insulation
Minnesota’s freeze-thaw cycles make this problem particularly severe. Daytime temperatures above freezing combined with nighttime drops create perfect ice dam conditions throughout winter.
Seven Warning Signs of Ice Dam Problems
Catching ice dams early prevents catastrophic damage. Watch for these critical indicators:
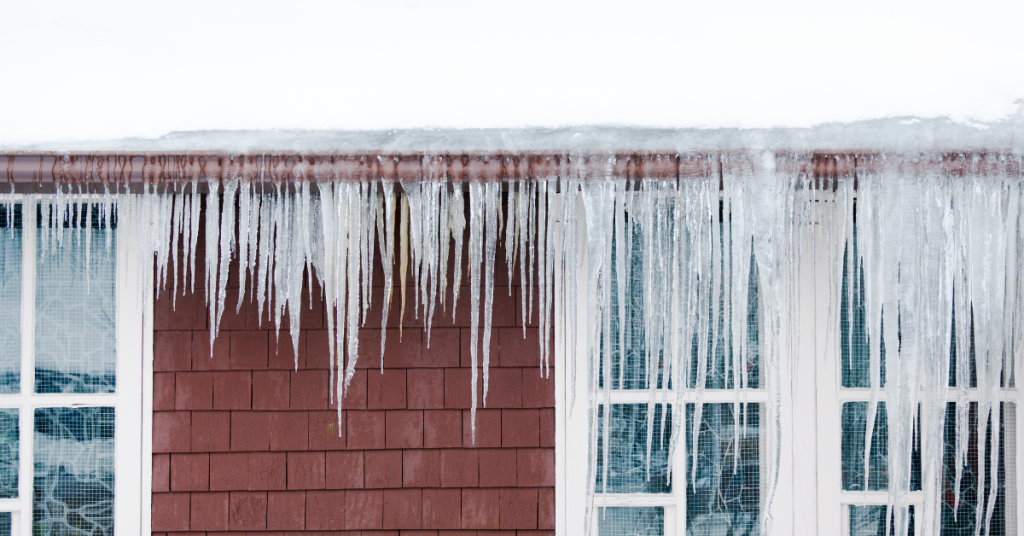
Large icicles hanging from roof edges: While small icicles are normal, large formations or entire rows indicate significant melting and refreezing patterns suggesting ice dam development.
Ice buildup visible on lower roof sections: Thick ice ridges along eaves, especially if several inches thick, confirm ice dam presence and mean water is likely already backing up.
Water stains on exterior walls below the roofline: Brown or yellow staining on siding directly under roof edges indicates water has penetrated and is escaping through exterior walls.
Interior ceiling stains or sagging: Water spots, discoloration, or drooping ceiling material in rooms near exterior walls signal active leaking from ice dams above.
Attic moisture or frost buildup: Check your attic during cold spells—frost on rafters or wet insulation indicates heat loss that contributes to ice dam formation.
Peeling paint or damaged plaster near ceilings: Water infiltration causes paint to bubble and plaster to crack or crumble in upper corners of rooms near exterior walls.
Gutters pulling away or sagging: Ice weight can exceed what gutters are designed to support, causing them to separate from fascia boards or bend under the load.
Step-by-Step: Emergency Ice Dam Removal
When ice dams form and cause active leaking, immediate action prevents further damage:
Step 1: Create drainage channels safely. From inside your home near a window, use a roof rake with an extended handle to carefully pull snow off the lower three to four feet of your roof. Never use metal tools that damage shingles.
Step 2: Make calcium chloride ice melt tubes. Fill old pantyhose or fabric tubes with calcium chloride ice melt (not rock salt, which damages roofing). Place tubes perpendicular to the roof edge, creating channels for water to escape.
Step 3: Address interior damage immediately. Place buckets under active leaks, move furniture and belongings away from affected areas, and use fans to dry wet surfaces preventing mold growth.
Step 4: Document everything for insurance. Photograph ice dams, interior damage, and the removal process. Keep receipts for emergency services or supplies used during mitigation.
Step 5: Call professionals for severe situations. If ice dams exceed several inches thick, cover large roof sections, or cause extensive interior damage, professional steam removal prevents further harm without roof damage.
Step 6: Never attempt dangerous removal methods. Avoid climbing on icy roofs, using hammers or chisels that puncture shingles, or applying hot water that refreezes quickly and worsens problems.
Long-Term Prevention: The Three-Part Solution
Preventing ice dams requires addressing the root cause—heat loss from your home. The most effective approach combines three strategies:
Improve Attic Insulation
Proper insulation creates a thermal barrier preventing heat from reaching your roof deck. Minnesota homes need significantly higher insulation values than national standards due to our extreme winters.
Check your attic insulation depth and condition. Compressed, wet, or insufficient insulation allows heat transfer that melts roof snow. Add insulation to achieve recommended R-values for Minnesota climate zones, typically between R-49 and R-60 for attic floors.
Pay special attention to areas around chimneys, plumbing vents, recessed lights, and attic hatches where gaps commonly allow heat escape. These thermal bridges contribute disproportionately to ice dam formation.
Seal Air Leaks Thoroughly
Air leakage carries more heat into attics than many homeowners realize. Warm air finds every crack, gap, and penetration in your ceiling.
Identify and seal common leak points including electrical boxes in ceilings, plumbing stack penetrations, attic hatches, recessed lighting fixtures, and gaps around chimneys. Use appropriate materials—expanding foam for large gaps, caulk for small cracks, and weatherstripping for movable components like attic doors.
Kitchen and bathroom exhaust fans must vent completely outside, never into attic spaces. Even small amounts of warm, moist air create frost that melts during temperature swings.
Ensure Proper Attic Ventilation
Balanced ventilation removes any heat that does reach your attic, maintaining roof temperature at or near outdoor ambient temperature.
Your attic needs both intake ventilation at soffits and exhaust ventilation at the ridge or gables. Blocked soffit vents from insulation or insufficient total ventilation area prevents proper air circulation.
Calculate your attic’s square footage and ensure adequate ventilation area based on building codes. Generally, you need one square foot of net free ventilation area for every 150 square feet of attic space, split equally between intake and exhaust.
Short-Term Prevention Strategies That Help
While addressing insulation, air sealing, and ventilation provides permanent solutions, these interim measures reduce ice dam risks:
Use a roof rake after heavy snowfalls: Remove snow from the lower four to five feet of your roof after storms exceeding six inches. This eliminates the material that creates ice dams.
Install heat cables along roof edges: Electric heat cables prevent ice formation along eaves and in gutters. While they consume electricity and address symptoms rather than causes, they provide temporary protection.
Keep gutters clean before winter: Clogged gutters worsen ice dam problems by creating additional ice accumulation points and preventing any drainage that might occur.
Monitor attic temperatures: During cold weather, check your attic temperature. It should closely match outdoor temperature. Significantly warmer attics indicate heat loss requiring attention.
Improve insulation around attic hatches: Many hatches lack adequate insulation and weatherstripping, creating major heat loss points directly contributing to ice dams above.
When to Call Professional Help
Contact roofing professionals immediately if:
- Ice dams exceed four inches thick or cover more than three feet of roof edge
- You observe active interior leaking with water running down walls or dripping from ceilings
- Previous ice dam removal attempts failed to resolve recurring problems
- Your roof age exceeds twenty years and may have compromised shingles vulnerable to damage
- You lack safe access or proper equipment for snow removal from ground level
- Structural damage appears including sagging gutters, loose fascia boards, or damaged roof edges
Schedule preventive consultations when:
- You’ve experienced ice dams multiple winters despite DIY prevention efforts
- Your attic shows signs of inadequate insulation or ventilation
- You’re planning roof replacement and want to address ice dam causes permanently
- Energy bills seem excessive, suggesting heat loss that contributes to ice dams
- You’re purchasing a home with a history of winter ice problems
Professional contractors can assess your specific situation, identify heat loss sources, and recommend comprehensive solutions addressing root causes rather than temporary fixes.
The Bottom Line: Your Ice Dam Action Plan
Ice dam prevention is essential if:
- Your home has experienced ice dams in previous winters
- You notice the warning signs listed above during current winter weather
- Your attic feels warm during cold weather or shows inadequate insulation
- Large icicles regularly form along your roof edges
- Your home was built before modern insulation standards were implemented
Take immediate action when:
- Active leaking occurs inside your home from ice dam water infiltration
- Ice dams grow rapidly during freeze-thaw cycles
- Structural concerns develop including gutter damage or fascia board separation
Next Steps: Protecting Your Minnesota Home
Start with these immediate actions:
- Inspect your attic today—check insulation depth, look for air leaks, and verify ventilation isn’t blocked
- Purchase a roof rake and calcium chloride ice melt before the next major snowfall
- Clear your gutters completely if not already done for winter
- Document current insulation levels with photos and measurements for contractor consultations
- Review your homeowner’s insurance policy to understand ice dam damage coverage
- Schedule professional attic insulation and ventilation assessment before next winter
For Minnesota homeowners in Savage and surrounding areas, Exteriors Plus provides comprehensive ice dam prevention solutions including roof inspections, attic insulation upgrades, ventilation improvements, and emergency ice dam removal services. As a Star Tribune award-winning contractor with decades of Minnesota experience, their team understands the specific challenges our climate creates. They offer free inspections to identify your home’s vulnerabilities and develop customized prevention strategies. Contact Exteriors Plus at (952) 345-3408 to schedule your free consultation and protect your home from costly ice dam damage this winter and beyond.